My Treasure…My Pleasure

Authentic Kerala Cuisine & much more…

Archive for November, 2006

Unniyappam

Posted by Annita on November 30, 2006

I’ve been preparing unniyappams quite often nowadays,as my lil’ one loves to have it.Whenever I’ve some extra ripe bananas,I go for this delicious snack.But this time I made it with a purpose.Can u guess what’s it?Yes…these are going to Kay’s JFI-Jaggery .I couldn’t participate in many of the previous JFI’s,so really wanted to do something this time.Happy hosting,Kay..

Unniyappam

Here’s the recipe..

Ingredients:-

Rice Flour – 2 cups
Jaggery(Sharkkara) broken into small pieces – 1/2 cup or Brown Sugar – 1 cup
Mashed bananas/jackfruits – 1 cup
Cardamom(Elakka) powder – 1/4 tsp
Dry roast Coconut pieces(Thengakothu) – 2-3 tsp (Optional)
Roasted black sesame seeds(Ellu) – 1/2 tsp (Optional)
Baking soda – 1/8 tsp (Optional)
Salt – 1/4 tsp

Method:-

Heat jaggery pieces adding little water,allow it to melt,strain it and keep aside.In a mixing bowl,mix together all the ingredients except coconut pieces and sesame seeds,adding extra water if needed to make it to a thick batter consistency.Use a hand mixer if you have one,otherwise use your hand,but be sure to mix it thoroughly .Finally add in coconut pieces and sesame seeds,stir and allow it to stand for 45 mts- 1 hr .

Unniyappam

Heat the Unniyappam pan,and fill oil in each impression upto 3/4 full.When the oil is very hot,reduce the heat to medium and fill the impressions with the batter upto a little more than 3/4th full.Allow it to cook slowly until done.Do not cover the pan.

Unniyappam

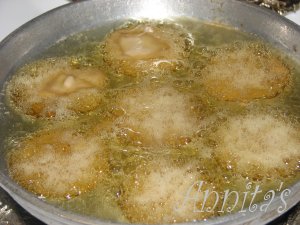
When one side is done,flip over to the other side and cook.It’ll come out easily without sticking,if its cooked well.

Unniyappam

Cook until both sides are golden brown in color.Remove and drain it to a tissue paper.Serve hot.

Unniyappam

P.S:- Unniyappams prepared with fruits won’t last for more than 4-5 days.

Check variety Unniyappams from fellow bloggers :Inji’s (with sooji),Priya’s (with both wheat rava & rice flour),RP’s ( batter prepared by grinding long grain rice),and Vizmaya’s(with all purpose flour and sooji)

Posted in Fruit Dishes, Lil' Milan's Choice, Snacks & Appetizers, Traditional Kerala Dishes | 43 Comments »

Fried Brinjals

Posted by Annita on November 28, 2006

Who doesn’t love the flavour of brinjal ,when fried ?Another simple dish which goes very well with rice and curd,its my favorite in the quick fix menu.

Fried Eggplant
Fried Brinjals

Ingredients:-

Small Brinjal sliced – 2
Onion sliced thin- 1
Curry leaves – a sprig
Chilly powder – 1 tsp
Turmeric powder -1/2 tsp
(Instead of chilly powder and turmeric,you can also use Sambar powder for a change)
Salt – to taste
Oil – as needed

Method:-

Make a thick paste with chilly powder and turmeric powder,adding little water.Add this paste to the brinjal slices and mix them well such that each slice isĀ  coated with the masala.Shallow fry it in batches,turning both sides untilĀ  brown.Drain it to a tissue paper and keep aside.As an alternative,you can even broil it for 5-10 mts each side.
Heat little oil(use the leftover oil from shallow frying) in a pan,and saute onion and curry leaves until onion turns translucent.Add it to the fried brinjal slices.Mix and serve with rice.

Posted in Veg Dishes | 18 Comments »

Vaazhakka Tholi (Plantain Peel) Fry

Posted by Annita on November 27, 2006

Now a simple and quick preparation with the leftover plantain peels.I prepared this new (atleast to me) side dish last week and we all loved the crunchy peppery flavour of it.Thanks to my loving sister for the recipe.


Vaazhakka Tholi Fry

And the recipe..

Ingredients:-

Vaazhakka Tholi
Plantain Peel

Raw Plantain peels cut into juliennes – 1 cup
Salt – as needed
Pepper – as needed

Method:-

Cook the plantain pieces adding salt and little water until it is done.I cooked it in microwave for 5 mts.Now heat oil in a pan,add the cooked peels and saute it for a while.Mix in crushed pepper and fry it in medium heat until dry and crispy.Serve hot with rice.

Vaazhakka Tholi Fry

Posted in Traditional Kerala Dishes, Veg Dishes | 23 Comments »

Vellarikka(Cucumber) Kichadi

Posted by Annita on November 23, 2006

Kichadi/Pachadi which is served in Sadyas,can be prepared with different vegetables.This dish is commonly known as Pachadi,but towards south Kerala this is called Kichadi.I still confuse about the terms Pachadi and Kichadi,but i’ve heard that in Pachadi, pounded mustard seeds are added along with coconut,while in Kichadi mustard seeds are used just for seasoning.If you have any other explanations,pls come forward and share..

Vellarikka
Vellarikka

Kichadi
Kichadi

Anyway here’s the recipe …

Ingredients:-

Cucumber peeled,deseeded and cut into small dices – 2 cups
Green chillies slit – 3
Grated coconut – 1/2 cup
Beaten curd – 1 and 1/2 cups
Cumin seeds – 1/2 tsp
Mustard seeds – 1/2 tsp
Red Chillies – 2
Curry leaves – a sprig
Coconut oil – 2 tbsp
Salt – to taste

Method:-

Add salt,green chillies and very little water(about 1- 2tsp) to the cucumber pieces.Cover it and cook in medium heat till the mixture is dry .Grind together grated coconut and cumin seeds, and add this ground mixture to the cucumber.Add beaten curd and mix well.
Heat coconut oil in a pan,allow mustard seeds to splutter.Add red chillies and curry leaves and fry for a while.Pour the seasoning over the kichadi.Mix well and serve with rice.

Wishing you all a Happy Thanksgiving !!!!

Posted in OnaSadya, Traditional Kerala Dishes, Veg Dishes | 11 Comments »

Learning Series 4-Praline Gateau

Posted by Annita on November 20, 2006

Praline Gateau

Praline Gateau
Click on the images to enlarge

Method:-

1.Bake two square cakes.
2.Cool the cake and level it using a knife/cake leveler,to remove the crown from the cake.
3.Cut all the four sides of one cake to make it a smaller square cake.
4.Apply apricot glaze over the cake and allow it to set.
5.Prepare butter icing and praline and keep it aside.
6.Using a metal spatula gently apply butter icing evenly all over the cakes to get a smooth finish.
7.Apply crushed praline on the sides of the cake using your hands.
8.Allow the icing to set completely.
9.Carefully place the smaller cake over the bigger.
10.Pipe border designs.
11.Prepare some more caramel and pipe different patterns using this .Also dip strawberries/any other fruits in the caramel and allow it to cool.
12.Decorate the cake with caramel dipped fruits and piped caramel designs.
13.Serve immediately.

Posted in Cake Decoration, Learning Series | 15 Comments »